Convert a Website into Android Application with Navigation Drawer Layout

In this Article I will teach you how to make Professional looking Android WebView Application with Navigation drawer Layout. And i also provide you the source code of my application which i show you in video.

Features of App:
  1. Navigation Drawer Layout
  2. Dedicated progress bar
  3. Two dedicated menu
  4. Advance webview integration
  5. External link opening in browser
Android Studio


Steps:

1. Create a New Project in Android Studio like the screenshot and choose your desire Appame and Package Name. 

New Project in Android Studio

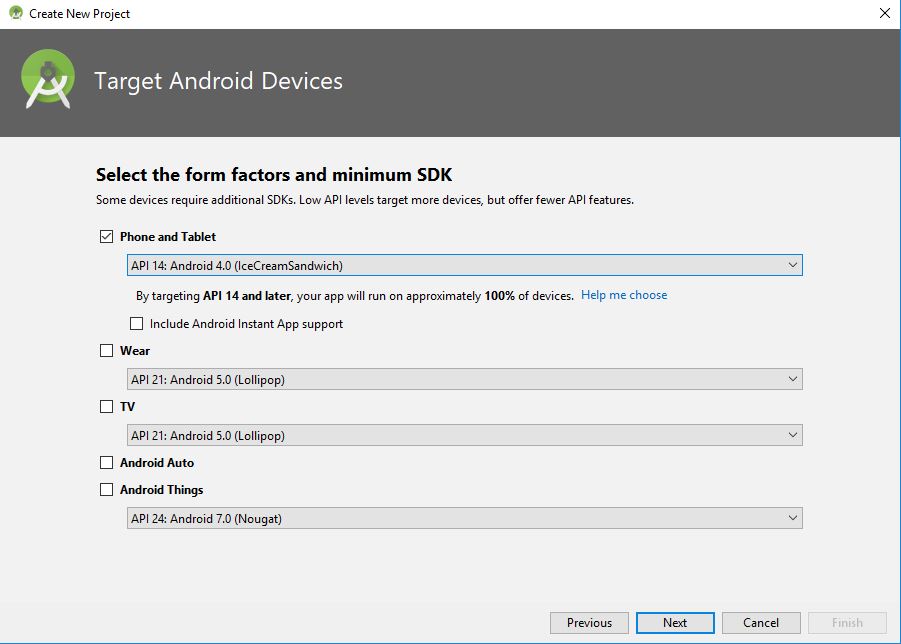
2. Select the SDK to Minimum like me or you can choose yours own too.

Android Studio

3. Now in third step select "Navigation Drawer Activity", You can choose any of activity but because we are creating navigation drawer so it is easy to choose navigation drawer.

Android Studio Navigation Drawer


4. Now Here not change anything, just click on Finish and after that actual work begins.

Android Studio

5. Now Navigate to MainActivity.java and double click on it

Android Studio Main Activity

6. Now Copy and Paste below Code into MainActivity.java file. Replace my package name with your's in first line of code. In Line No 65 replace "http://www.kknlive.com" with your URL. Don't add anything special paste in same same format you are looking. Next Change the URLs of Menu button from line 111 to 121. After that again change the URL in line number 132 and after that if you want to change the progress bar text then you can change it on line number 149 and 150.


package com.kknlive.kkn;
import android.app.ProgressDialog;
import android.content.Intent;
import android.graphics.Bitmap;
import android.net.Uri;
import android.os.Bundle;
import android.support.design.widget.FloatingActionButton;
import android.support.design.widget.Snackbar;
import android.view.KeyEvent;
import android.view.View;
import android.support.design.widget.NavigationView;
import android.support.v4.view.GravityCompat;
import android.support.v4.widget.DrawerLayout;
import android.support.v7.app.ActionBarDrawerToggle;
import android.support.v7.app.AppCompatActivity;
import android.support.v7.widget.Toolbar;
import android.view.Menu;
import android.view.MenuItem;
import android.webkit.WebSettings;
import android.webkit.WebView;
import android.webkit.WebViewClient;
import java.net.URI;
public class MainActivity extends AppCompatActivity
implements NavigationView.OnNavigationItemSelectedListener {
//initializing WebView
private WebView mwebView;
@Override
protected void onCreate(Bundle savedInstanceState) {
super.onCreate(savedInstanceState);
setContentView(R.layout.activity_main);
Toolbar toolbar = (Toolbar) findViewById(R.id.toolbar);
setSupportActionBar(toolbar);
DrawerLayout drawer = (DrawerLayout) findViewById(R.id.drawer_layout);
ActionBarDrawerToggle toggle = new ActionBarDrawerToggle(
this, drawer, toolbar, R.string.navigation_drawer_open, R.string.navigation_drawer_close);
drawer.setDrawerListener(toggle);
toggle.syncState();
NavigationView navigationView = (NavigationView) findViewById(R.id.nav_view);
navigationView.setNavigationItemSelectedListener(this);
//WebView
mwebView = (WebView) findViewById(R.id.myWebView);
WebSettings webSettings = mwebView.getSettings();
webSettings.setJavaScriptEnabled(true);
//improve webView performance
mwebView.getSettings().setRenderPriority(WebSettings.RenderPriority.HIGH);
mwebView.getSettings().setCacheMode(WebSettings.LOAD_CACHE_ELSE_NETWORK);
mwebView.getSettings().setAppCacheEnabled(true);
mwebView.setScrollBarStyle(View.SCROLLBARS_INSIDE_OVERLAY);
webSettings.setDomStorageEnabled(true);
webSettings.setLayoutAlgorithm(WebSettings.LayoutAlgorithm.NARROW_COLUMNS);
webSettings.setUseWideViewPort(true);
webSettings.setSavePassword(true);
webSettings.setSaveFormData(true);
webSettings.setEnableSmoothTransition(true);
mwebView.loadUrl("http://www.kknlive.com");
//force links open in webview only
mwebView.setWebViewClient(new MyWebviewClient());
}
@Override
public void onBackPressed() {
DrawerLayout drawer = (DrawerLayout) findViewById(R.id.drawer_layout);
if (drawer.isDrawerOpen(GravityCompat.START)) {
drawer.closeDrawer(GravityCompat.START);
} else {
super.onBackPressed();
}
}
@Override
public boolean onCreateOptionsMenu(Menu menu) {
// Inflate the menu; this adds items to the action bar if it is present.
getMenuInflater().inflate(R.menu.main, menu);
return true;
}
@Override
public boolean onOptionsItemSelected(MenuItem item) {
// Handle action bar item clicks here. The action bar will
// automatically handle clicks on the Home/Up button, so long
// as you specify a parent activity in AndroidManifest.xml.
int id = item.getItemId();
//noinspection SimplifiableIfStatement
if (id == R.id.action_settings) {
return true;
}
return super.onOptionsItemSelected(item);
}
@SuppressWarnings("StatementWithEmptyBody")
@Override
public boolean onNavigationItemSelected(MenuItem item) {
// Handle navigation view item clicks here.
int id = item.getItemId();
if (id == R.id.nav_video) {
// Handle the camera action
mwebView.loadUrl("http://www.kknlive.com/videos");
} else if (id == R.id.nav_society) {
mwebView.loadUrl("http://www.kknlive.com/society");
} else if (id == R.id.nav_technology) {
mwebView.loadUrl("http://www.kknlive.com/technology");
} else if (id == R.id.nav_sports) {
mwebView.loadUrl("http://www.kknlive.com/sports");
} else if (id == R.id.nav_about) {
mwebView.loadUrl("http://www.kknlive.com/about");
} else if (id == R.id.nav_contact) {
mwebView.loadUrl("http://www.kknlive.com/contact");
}
DrawerLayout drawer = (DrawerLayout) findViewById(R.id.drawer_layout);
drawer.closeDrawer(GravityCompat.START);
return true;
}
private class MyWebviewClient extends WebViewClient {
@Override
public boolean shouldOverrideUrlLoading(WebView view, String url) {
if (Uri.parse(url).getHost().equals("www.kknlive.com")) {
//open url contents in webview
return false;
} else {
//here open external links in external browser or app
Intent intent = new Intent(Intent.ACTION_VIEW, Uri.parse(url));
startActivity(intent);
return true;
}
}
//ProgressDialogue
ProgressDialog pd = null;
@Override
public void onPageStarted(WebView view, String url, Bitmap favicon) {
pd=new ProgressDialog(MainActivity.this);
pd.setTitle("Please wait..");
pd.setMessage("Page is Loading..");
pd.show();
super.onPageStarted(view, url, favicon);
}
@Override
public void onPageFinished(WebView view, String url) {
pd.dismiss();
super.onPageFinished(view, url);
}
}
//goto previous page when pressing back button
@Override
public boolean onKeyDown(int keyCode, KeyEvent event) {
if (event.getAction() == KeyEvent.ACTION_DOWN) {
switch (keyCode) {
case KeyEvent.KEYCODE_BACK:
if (mwebView.canGoBack()) {
mwebView.goBack();
} else {
finish();
}
return true;
}
}
return super.onKeyDown(keyCode, event);
}
}
view raw .java hosted with ❤ by GitHub
Now we are done with Java Files. If android studio shows any errors ignore them. All errors will be gone by the end of this tutorial.

7. Now Scroll to Layout Folder and there you find many .xml files. So, now paste the below code on "activity_main.xml"

<?xml version="1.0" encoding="utf-8"?>
<android.support.v4.widget.DrawerLayout xmlns:android="http://schemas.android.com/apk/res/android"
xmlns:app="http://schemas.android.com/apk/res-auto"
xmlns:tools="http://schemas.android.com/tools" android:id="@+id/drawer_layout"
android:layout_width="match_parent" android:layout_height="match_parent"
android:fitsSystemWindows="true" tools:openDrawer="start">
<include layout="@layout/app_bar_main" android:layout_width="match_parent"
android:layout_height="match_parent" />
<android.support.design.widget.NavigationView android:id="@+id/nav_view"
android:layout_width="wrap_content" android:layout_height="match_parent"
android:layout_gravity="start" android:fitsSystemWindows="true"
app:headerLayout="@layout/nav_header_main" app:menu="@menu/activity_main_drawer" />
</android.support.v4.widget.DrawerLayout>
view raw .xml hosted with ❤ by GitHub
8. Now Paste the below code in "app_bar_main.xml

<?xml version="1.0" encoding="utf-8"?>
<android.support.design.widget.CoordinatorLayout
xmlns:android="http://schemas.android.com/apk/res/android"
xmlns:app="http://schemas.android.com/apk/res-auto"
xmlns:tools="http://schemas.android.com/tools" android:layout_width="match_parent"
android:layout_height="match_parent" android:fitsSystemWindows="true"
tools:context=".MainActivity">
<android.support.design.widget.AppBarLayout android:layout_height="wrap_content"
android:layout_width="match_parent" android:theme="@style/AppTheme.AppBarOverlay">
<android.support.v7.widget.Toolbar android:id="@+id/toolbar"
android:layout_width="match_parent" android:layout_height="?attr/actionBarSize"
android:background="?attr/colorPrimary" app:popupTheme="@style/AppTheme.PopupOverlay" />
</android.support.design.widget.AppBarLayout>
<include layout="@layout/content_main" />
</android.support.design.widget.CoordinatorLayout>
view raw .xml hosted with ❤ by GitHub
9. Now Paste below code in "content_main.xml

<?xml version="1.0" encoding="utf-8"?>
<RelativeLayout xmlns:android="http://schemas.android.com/apk/res/android"
xmlns:app="http://schemas.android.com/apk/res-auto"
xmlns:tools="http://schemas.android.com/tools"
android:layout_width="match_parent"
android:layout_height="match_parent"
app:layout_behavior="@string/appbar_scrolling_view_behavior"
tools:context=".MainActivity"
tools:showIn="@layout/app_bar_main">
<WebView
android:id="@+id/myWebView"
android:layout_width="match_parent"
android:layout_height="match_parent" />
</RelativeLayout>
view raw .xml hosted with ❤ by GitHub
10. Now paste below code in "navigation_header_main.xml"


<?xml version="1.0" encoding="utf-8"?>
<LinearLayout xmlns:android="http://schemas.android.com/apk/res/android"
android:layout_width="match_parent" android:layout_height="@dimen/nav_header_height"
android:background="@drawable/side_nav_bar"
android:paddingBottom="@dimen/activity_vertical_margin"
android:paddingLeft="@dimen/activity_horizontal_margin"
android:paddingRight="@dimen/activity_horizontal_margin"
android:paddingTop="@dimen/activity_vertical_margin"
android:theme="@style/ThemeOverlay.AppCompat.Dark" android:orientation="vertical"
android:gravity="bottom">
<ImageView android:layout_width="wrap_content" android:layout_height="wrap_content"
android:paddingTop="@dimen/nav_header_vertical_spacing"
android:src="@mipmap/ic_launcher" android:id="@+id/imageView" />
<TextView android:layout_width="match_parent" android:layout_height="wrap_content"
android:paddingTop="@dimen/nav_header_vertical_spacing" android:text="KKN Live"
android:textAppearance="@style/TextAppearance.AppCompat.Body1" />
<TextView android:layout_width="wrap_content" android:layout_height="wrap_content"
android:text="www.kknlive.com" android:id="@+id/textView" />
</LinearLayout>
view raw .xml hosted with ❤ by GitHub
11. Now Scroll to Menu Folder and Open "activity_main_drawer.xml" and paste the below code there, you can edit the details of menu as per your requirement.

<?xml version="1.0" encoding="utf-8"?>
<menu xmlns:android="http://schemas.android.com/apk/res/android">
<group android:checkableBehavior="single">
<item android:id="@+id/nav_video" android:icon="@android:drawable/ic_menu_view"
android:title="Video" />
<item android:id="@+id/nav_society" android:icon="@android:drawable/ic_delete"
android:title="Society" />
<item android:id="@+id/nav_technology" android:icon="@android:drawable/ic_lock_power_off"
android:title="Tech" />
<item android:id="@+id/nav_sports" android:icon="@android:drawable/ic_dialog_dialer"
android:title="Sports" />
</group>
<item android:title="Communicate">
<menu>
<item android:id="@+id/nav_about" android:icon="@android:drawable/btn_star"
android:title="About us" />
<item android:id="@+id/nav_contact" android:icon="@android:drawable/ic_menu_send"
android:title="Contact us" />
</menu>
</item>
</menu>
view raw .xml hosted with ❤ by GitHub
12. Now Paste the below code in "main.xml", this is for secondary menu. 

<menu xmlns:android="http://schemas.android.com/apk/res/android"
xmlns:app="http://schemas.android.com/apk/res-auto"
xmlns:tools="http://schemas.android.com/tools" tools:context=".MainActivity">
<item android:id="@+id/action_settings" android:title="@string/action_settings"
android:orderInCategory="100" app:showAsAction="never" />
</menu>
view raw .xml hosted with ❤ by GitHub
Now we have completed the xml files. 


13. Now we just have to give the permission of internet access in Manifest.xml file, Now paste the below code after the package name and above the application activity in "AndroidManifest.xml


<uses-permission android:name="android.permission.INTERNET" />
view raw .xml hosted with ❤ by GitHub
By this we had finished all coding Part. Now you can run your app in emulator or on your phone now in next article i will explain you how to change the icon and how to add splash screen and many more things and for this i had also made separate video which is embeded with this article if you have any problem to understand this article you can watch the video, i explain everything in that video.


Hope you like this tutorial article, if you want more articles like this please do comment your feedback in comment section and share this with your buddies and loved ones.


Post a Comment

28 Comments

  1. Very usefull, how do you implemente a admob interstitial or banner in this? D you have any tutorial about that?

    ReplyDelete
    Replies
    1. This comment has been removed by the author.

      Delete
  2. Replies
    1. This is just wastage of time because a lot of design errors found in design Java section
      total craps

      Delete
  3. can i have this file for its not working

    ReplyDelete
  4. Hi it works very well I'm happy and a lot of courage for your courses thank you

    ReplyDelete
  5. want to open all links in same view dont need to go external browser
    pls tell me

    ReplyDelete
  6. when i remove }else { condition and return statement for true for if condition still got an error return statement missing
    added return super. shouldoverloadurl() and also facing an error

    ReplyDelete
  7. sir, mere android studio 3.4.2 me main activity ka option hi ni aa raha
    me kya karu

    ReplyDelete
  8. sir, app to ban gya lekin jab ham signed app build karke install karte hai to kisi v mobile me install nahi hota hai. Error ata hai ki app not install. Please help sir.

    ReplyDelete
  9. Hi, lovely work but am having an error when i want to run the app
    "error: cannot find symbol variable myWebView" tthats what it says. Thanks

    ReplyDelete
  10. 54 Error, 28 warning, 5 typos
    now solution

    ReplyDelete
  11. noob copy pasted in his blog....not even replying

    ReplyDelete
  12. I don't see any source code mentioned here? can you please paste it in the article?

    ReplyDelete
  13. so nice post and valuable information found in this site.
    Learn about the a href attribute

    thanks.

    ReplyDelete
  14. error: package android.support.design.widget does not exist

    help me to solve this sir.

    ReplyDelete
  15. Toolbar toolbar = (Toolbar)findViewById(R.id.toolbar);
    setSupportActionBar(toolbar);
    we are getting error inthis script in the Main active java page ,
    please help

    ReplyDelete
  16. How to implimate andriodx on MainActivity.java.Please reply

    ReplyDelete
  17. This comment has been removed by the author.

    ReplyDelete
  18. Users join with a dealer 바카라사이트 with a reside digital camera in front of them. They can then interact with the dealer and other players on the desk. If you'd instead prefer to consideration to} the desk, for example, you can to|you possibly can} change the digital camera whenever you want to. The sellers are also responsive and can usually interact directly with players, giving an authentic casino experience.

    ReplyDelete